
Beginner guitar chords: the first chords to learn and how to practice them
Learn the 8 essential beginner guitar chords, read chord diagrams, fix buzzing strings, and build a daily practice routine to play songs in your first weeks.

Beginner guitar chords: the first chords to learn and how to practice them
You don't need dozens of chords to start making music. Begin with just two open chords (such as A and D or Em and G), learn to switch between them cleanly, add a simple strum, and you'll be playing a real song loop in your first week. This guide covers the eight essential beginner chords, from reading your first chord diagram to building a short daily practice routine.
What you'll need before you start
You need surprisingly little gear to get going: a guitar in standard tuning (acoustic or electric both work), a tuner or free tuning app on your phone, and optionally a guitar pick. That's it.
Before you sit down, trim the fingernails on your fretting hand short enough that your fingertips can press the strings cleanly. Grab a comfortable chair without armrests, sit up straight, and rest the guitar on your leg.
One thing worth checking early: if pressing the strings feels extremely difficult even with good technique, your guitar's action (the distance between the strings and the fretboard) might be too high. A professional setup from a guitar tech can make a huge difference in playability. Yamaha's guide on making acoustic guitar easier to play covers this in detail.
How to read a guitar chord diagram
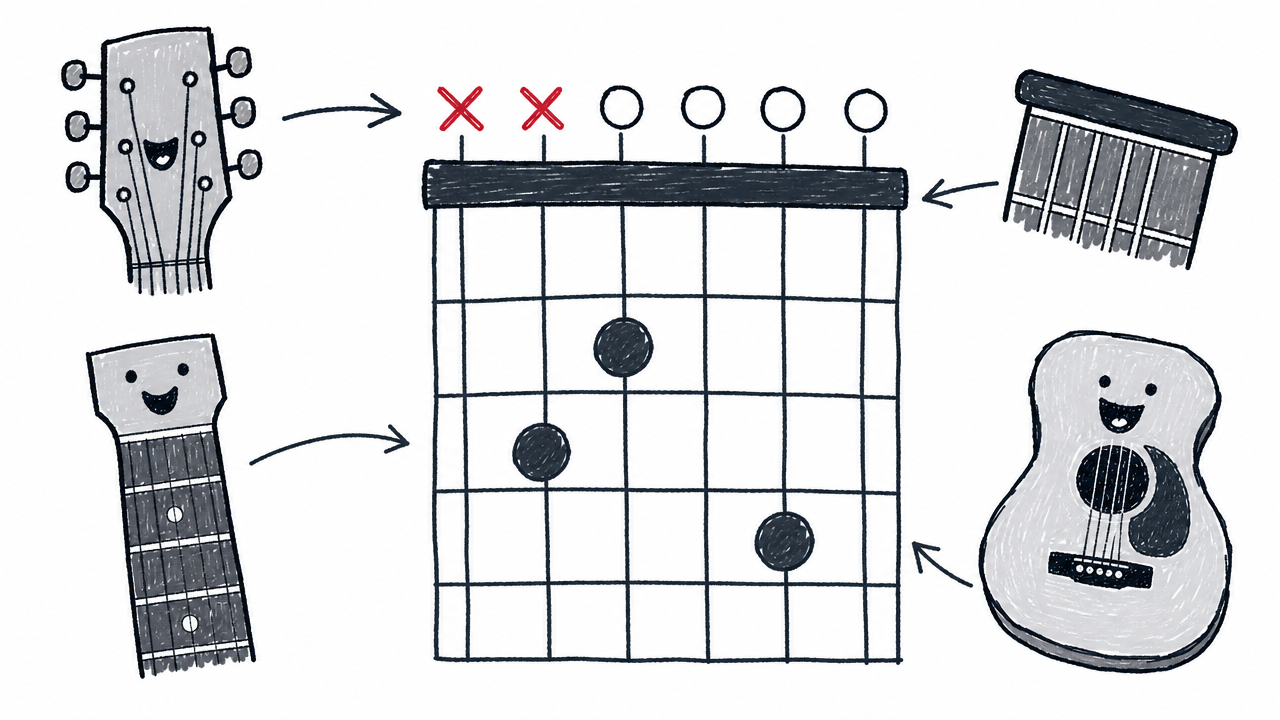
A chord diagram is a simple map of where to put your fingers. Once you understand five things, you can read any chord chart you'll encounter as a beginner.
Picture a grid. The six vertical lines represent your six guitar strings, with the low E (thickest string) on the left and the high E (thinnest) on the right. The horizontal lines represent frets. The thick line at the top is the nut, the white piece at the top of your guitar's neck.
Numbered dots on the grid tell you which finger to place where:
- 1 = index finger
- 2 = middle finger
- 3 = ring finger
- 4 = pinky
Above the grid you'll see two symbols:
- X = don't play this string (mute it or skip it when you strum)
- O = play this string open (let it ring without pressing any fret)
That's the whole system. Every chord in this article follows this notation, as explained by Fender's chord chart guide.
The 8 essential beginner guitar chords
These eight open chords form the foundation for thousands of songs. JustinGuitar identifies them as the essential beginner chord grips: A, D, E, C, G, Am, Dm, and Em.
If you'd like to see each grip demonstrated up close before you read on, Justin walks through all eight in this lesson video.
Video: The 8 Essential Beginner Chord Grips from the official JustinGuitar channel.
Don't try to learn all eight at once. Pick two chords, get comfortable switching between them, then add a third. You'll build your vocabulary gradually over a few weeks.
Which chords should I learn first?
There's no single correct order. Your finger size, guitar type, and the songs you want to play all matter. Here are two solid starting pairs:
- A and D: These two chords sit right next to each other on the fretboard, and JustinGuitar documents seven tunes playable with only A and D (some may require a capo).
- Em and G: Em uses only two fingers, making it one of the gentlest entry points. Pairing it with G gives you a useful loop right away.
Try both pairs and start with whichever feels more natural in your hand.
E minor (Em)
Place your 2nd finger (middle) on the A string, 2nd fret and your 3rd finger (ring) on the D string, 2nd fret. Strum all six strings.
That's it. Two fingers, six open strings ringing out. It's a great confidence-builder.
Common problem: The G string (3rd string) sounds muted. Make sure your 3rd finger is arched enough that it isn't accidentally touching the string below it.
Useful practice change: Em to G.
A major (A)
Pack three fingers onto the 2nd fret: 1st finger on the D string, 2nd finger on the G string, and 3rd finger on the B string. Strum from the A string down; avoid hitting the low E string.
The fingers are close together here, so use your fingertips and keep each finger arched.
Common problem: The high E string sounds dead because a finger is leaning against it. Curl those fingers tighter.
Useful practice change: A to D, A to E.
D major (D)
Form a compact triangle shape across the first three frets: 1st finger on the G string (2nd fret), 3rd finger on the B string (3rd fret), and 2nd finger on the high E string (2nd fret). Strum from the D string down only.
Common problem: Your strum accidentally catches the low E or A string, adding a muddy sound. Practice starting your strum from the D string.
Useful practice change: D to A, D to G.
E major (E)
Place your 1st finger on the G string (1st fret), 2nd finger on the A string (2nd fret), and 3rd finger on the D string (2nd fret). Strum all six strings.
Keep your fingers arched so the open B and high E strings ring clearly. This is one of the fullest-sounding open chords you'll learn.
Useful practice change: E to A, E to Am.
A minor (Am)
Am shares a family resemblance with E major but shifts up one string set. Place your 1st finger on the B string (1st fret), 2nd finger on the D string (2nd fret), and 3rd finger on the G string (2nd fret). Strum from the A string down.
Common problem: A flat index finger mutes the high E string. Curl that 1st finger so only the tip touches the B string.
Useful practice change: Am to C, Am to E.
C major (C)
Your 3rd finger (ring) anchors on the A string, 3rd fret. 2nd finger goes on the D string (2nd fret), and 1st finger on the B string (1st fret). Strum from the A string down.
C major requires a wider finger stretch than A or D, so take your time with it.
Common problem: The open high E string doesn't ring because your 1st finger is leaning on it. Adjust the angle of your index finger. Fender's guide to G, C, and D offers more context on this chord group.
Useful practice change: C to G, C to Am.
G major (G)
Several valid fingerings exist for G major. Here's one common version: 2nd finger on the A string (2nd fret), 1st finger on the high E string (2nd fret), and 3rd finger on the low E string (3rd fret). Strum all six strings.
This chord has the widest finger spread of the eight, so it may take a few sessions to feel comfortable. School of Rock's beginner chords page also covers this shape with diagrams.
Useful practice change: G to C, G to D.
D minor (Dm)
Introduce this one after you're comfortable with D major. Place your 1st finger on the high E string (1st fret), 2nd finger on the G string (2nd fret), and 3rd finger on the B string (3rd fret). Strum from the D string down.
Common problem: The narrow spacing feels cramped. Arch your fingers more and make sure each fingertip is pressing independently.
Useful practice change: Dm to Am, Dm to C.
Quick-reference table
From your first shape to your first song loop
This is the core method. Follow these steps in order, and you'll go from holding one chord to playing a recognizable song loop.
Step 1: Form one chord shape slowly
Pick your first chord (Em or A are great starting points). Place your fingers one at a time, looking at the chord diagram. Don't worry about speed at all. Just get the fingers in the right spots and hold the shape.
Step 2: Check each string individually
With the chord held, pluck or pick every intended string one by one, starting from the lowest string you're supposed to strum. Listen carefully. Does each string ring out clearly? Do any buzz, sound dead, or feel muted? Identify which finger is the problem.
This string-by-string check is your best diagnostic tool, and you'll use it every time you learn a new chord.
Step 3: Fix finger placement
Move the problem finger closer to the fret wire (the metal bar) without actually touching it. Use your fingertip, not the fleshy pad of your finger. Press only as hard as needed to get a clean note. JustinGuitar's "Positive Finger Placement" lesson calls this the sweet spot: close behind the fret, minimal pressure, clear tone.
Step 4: Repeat with a second chord
Choose the practice pair you identified earlier (for example, A and D). Form the second chord shape slowly, check every string, and adjust. Now you have two clean shapes in your memory.
Step 5: Practice the two-chord change
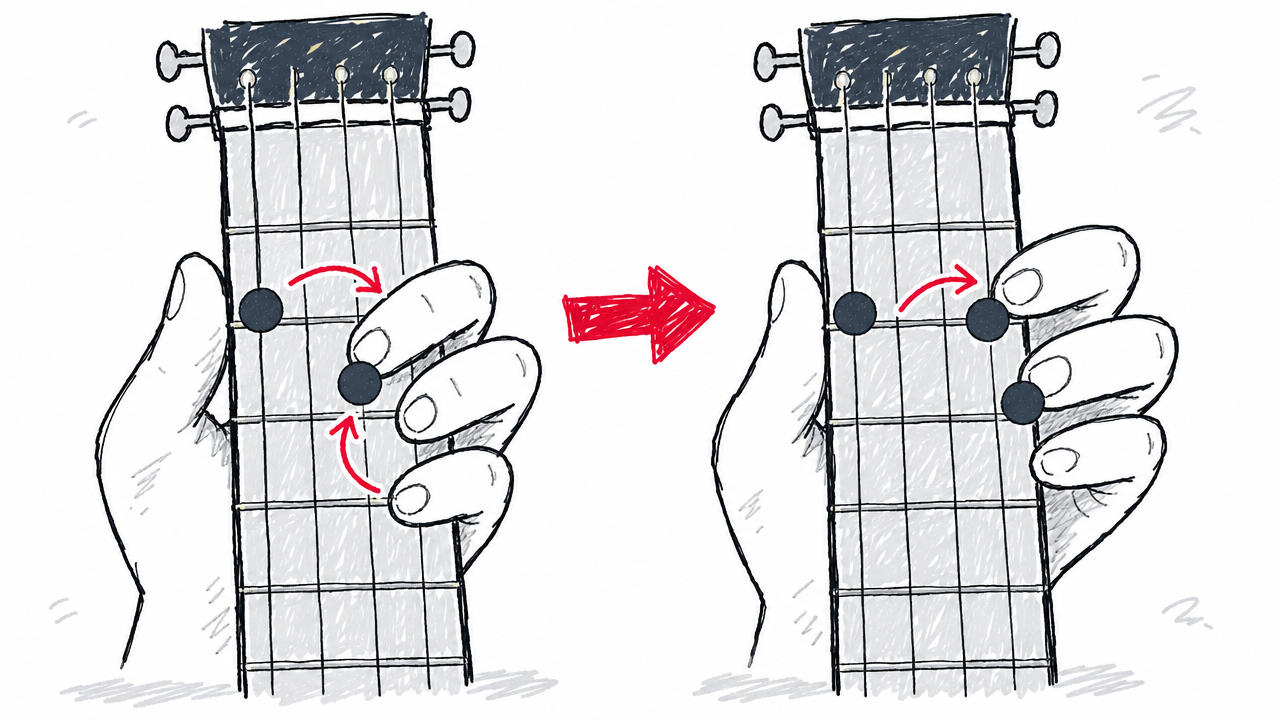
Strum chord one once, then release the pressure slightly without flinging your fingers away from the fretboard. Move to chord two and strum once. Repeat this slowly for one minute.
Look for anchor fingers or pivot fingers: if a finger stays on the same string or fret between the two chords, keep it planted. This economy of motion makes the change faster and smoother.
Try JustinGuitar's One Minute Changes exercise: count how many clean changes you can make in 60 seconds. An early benchmark is roughly 30 changes per minute between D and A. Over time, aim to build toward about 60 changes per minute.
Seeing the drill in motion makes it click. Here's Justin running the original exercise.
Video: One Minute Changes (BC-115) from the official JustinGuitar channel.
Step 6: Add a steady downstroke
Now bring your strumming hand into the picture. One downstroke per beat. Count "1, 2, 3, 4" out loud. Strum four times on chord one, switch, strum four times on chord two.
Keep your strumming arm moving like a pendulum even if the chord isn't perfect yet. Rhythm matters more than perfection at this stage. Your fretting hand will catch up.
Step 7: Play a simple song loop
Combine your two chords into a repeating loop and congratulate yourself: you're playing music.
Suggested loops to try:
- A → D (four strums each, repeat)
- G → C (four strums each, repeat)
- G → Em → C → D (four strums each, a classic I-vi-IV-V feel)
JustinGuitar documents seven tunes playable with just A and D (some may require a capo). Fender lists songs like "Ring of Fire" by Johnny Cash and "9 to 5" by Dolly Parton as examples that use G, C, and D together.
How to make every chord sound clean
Every clean chord starts with the same routine: form the shape slowly, strum once, then pick each string one at a time. If a string buzzes or sounds dead, that's your cue to adjust.
Here are the technique fundamentals that fix most problems:
- Use fingertips, not pads. The bony tip of your finger presses a smaller area and is less likely to accidentally touch neighboring strings.
- Keep fingers arched. Imagine holding a small ball in your hand. That natural curl keeps your fingers off strings they shouldn't touch.
- Place close to the fret wire. Your finger should sit just behind the metal fret bar (toward the tuning pegs), not in the middle of the fret space.
- Don't death-grip the neck. Press only hard enough to produce a clean note. Squeezing harder wastes energy and causes fatigue.
- Keep your thumb relaxed. It should rest roughly behind the center of the neck, acting as a counterpoint to your fingers.
- Trim fretting-hand nails. Long nails prevent your fingertips from reaching the strings at the right angle.
JustinGuitar's positive finger placement lesson is a great visual reference for these points.
Why do my chords buzz or sound muted?
Buzzing and muting are the two most common beginner frustrations, and they almost always have a fixable cause.
Buzzing usually means your finger is too far from the fret wire, or you're not pressing hard enough. Move the finger closer to the metal bar and apply slightly more pressure.
Muted strings usually mean a finger is accidentally touching an adjacent string. Arch your fingers more and check that each fingertip is landing squarely.
If every chord buzzes or feels painfully hard to press despite solid technique, the issue might be your guitar's action or neck relief, not your hands. A professional setup can lower the action to a comfortable height. Yamaha's guide explains what to ask for.
Adding simple strumming patterns
Start by isolating rhythm from chords. Lightly rest your fretting hand across the strings to mute them, then practice strumming in four-four time: one downstroke per beat, counting "1, 2, 3, 4" aloud. This builds a steady strumming-hand motion without the distraction of chord shapes.
Once that feels natural, apply it to a single chord. Four downstrokes, nice and even.
Next, add upstrokes. Count "1 and 2 and 3 and 4 and," with downstrokes on the numbers and upstrokes on the "ands." Keep your arm swinging like a pendulum; the upstroke is just the return trip.
When you're ready for a pattern, try this simple one: Down, Down, Up, Up, Down, Up (D, D, U, U, D, U). Practice it slowly on muted strings first, then on a single chord, then over a two-chord loop.
Strumming rhythm is much easier to copy by ear and eye than from text. Andy's on-the-beat tutorial is a great watch-along.
Video: Beginners Guitar Strumming Pattern 1 from the official Andy Guitar channel.
The golden rule: keep your strumming arm moving at a constant speed. If the chord change isn't ready, it's better to strum a slightly messy chord on time than to stop your arm and lose the rhythm.
When should a beginner learn the F chord?
The full F major barre chord is a milestone, not a starting point. It asks you to press all six strings with one finger while fretting extra notes, and that takes hand strength and technique that develop over weeks or months.
You don't need it right now. Plenty of great songs use only the eight open chords covered above.
When you're ready to dip your toes in, try a partial F or Fmaj7 shape. For Fmaj7, place your 1st finger on the B string (1st fret) and your 2nd finger on the G string (2nd fret). Strum only the top four strings. It's not a full F major, but it works as a substitute in many chord progressions and gets your hand used to the first-fret territory.
Barre chords (where one finger presses strings across a single fret) are a natural next step once your open chords feel solid. They open up every key on the fretboard. But they aren't needed right away, and there's no rush.
A 15-minute daily practice routine
Short, focused sessions beat long, unfocused ones. JustinGuitar recommends roughly 20-minute sessions, four days per week, which is a realistic target for adult beginners. Here's a slightly condensed version you can fit into a busy day, practiced four to five days per week:
At the end of each session, make a quick mental note of what improved and what felt tricky. That awareness shapes tomorrow's focus.
Consistency matters more than duration. Fifteen minutes every day builds muscle memory and calluses faster than a two-hour weekend marathon.
Troubleshooting and common mistakes
Pressing too hard. You only need enough pressure to make a clean note. Squeezing the neck causes hand fatigue and slows your chord changes.
Fingers on the fret wire. Place your finger just behind the fret, not directly on top of the metal bar. Sitting on the wire creates a dead, muted sound.
Strumming strings marked X. If a chord diagram says X on the low E, train your strum to start one string lower. This takes practice but cleans up your sound significantly.
Rushing chord changes. It's tempting to speed up before the shape is solid. Slow, accurate changes build the right muscle memory. Speed comes naturally with repetition.
Ignoring rhythm. A slightly imperfect chord played on the beat sounds better than a perfect chord played late. Always keep your strumming arm moving.
Not tuning the guitar. An out-of-tune guitar makes everything sound wrong, no matter how good your technique is. Tune every time you pick it up.
Finger soreness. Mild fingertip soreness is completely normal in the first few weeks. It fades as calluses develop. Practice in short sessions and give your fingers a day off if they're tender.
Sharp pain, wrist pain, or numbness is NOT normal. If you experience any of these, stop immediately. Reassess your hand position, wrist angle, and how hard you're pressing. If it persists, consult a guitar teacher or a medical professional.
FAQ
Is E minor the easiest guitar chord?
Em is often cited as the easiest because it uses only two fingers and you strum all six strings. It's a great first chord and an instant confidence-builder. That said, "easiest" can vary by hand size and finger comfort, so try it alongside A or D and see what clicks.
How many chords should a beginner learn?
Start with two and get comfortable switching between them. Expand to four or five within a few weeks, then aim for all eight essential open chords over one to two months. You can play real songs with as few as two chords. JustinGuitar's two-chord song lesson proves it.
Is C major or G major easier to learn?
It depends on the player. G major involves a wider finger stretch across the fretboard. C major requires more precise placement to avoid muting the high E string. Try both and start with whichever feels more natural. Neither is objectively harder.
Can beginners play chords on electric and acoustic guitar?
Yes. Open chords use the same shapes and techniques on both. Electric guitars often have lower action and lighter strings, which can feel easier on the fingertips. An acoustic guitar projects sound without an amp. Either works perfectly for learning.
Is finger pain normal when learning guitar?
Mild fingertip soreness is common and fades as calluses develop over days and weeks. Practice in short sessions (15 to 20 minutes) to manage discomfort. Sharp pain, wrist pain, or numbness is not normal and is a signal to stop, check your technique, and consider having your instrument's setup examined. JustinGuitar's guide on minimizing finger pain offers helpful advice.